An outdoor kitchen is a natural gathering spot in the landscape. After all, everyone ends up in the kitchen indoors, so the odds are great that the same thing will happen when there’s a kitchen outside. An outdoor kitchen encourages you to enjoy dining al fresco whenever the weather is good, whether you have guests or not. When it’s time to entertain on a larger scale, the outdoor kitchen allows you to be part of the party.
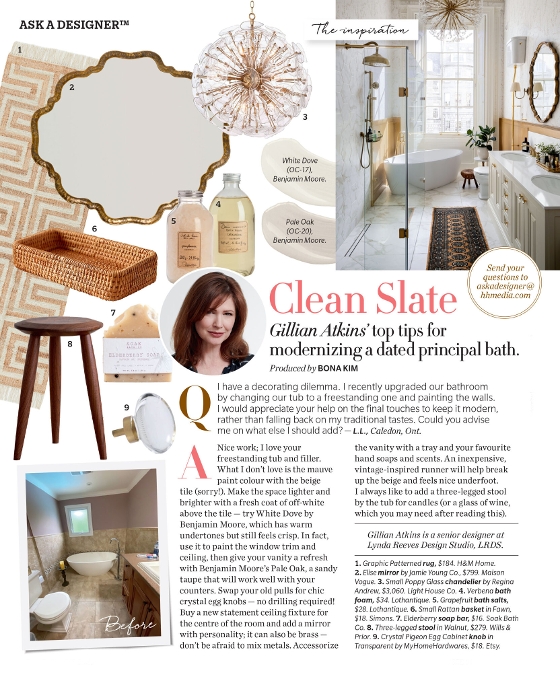
Read on to learn more about what adding an outdoor kitchen entails, whom to hire, the pluses and minuses of different appliances and building materials, added features you might want to consider and the timing of getting from the initial planning stage to the finished project.
An outdoor kitchen is a major undertaking in terms of time and expense. Before you take the plunge, decide if what you’re dreaming of is something you will use. If budget is a concern, consider adding an outdoor kitchen in stages.
Whom to Hire
There are a lot of pieces to consider for an outdoor kitchen, even if you’re doing a small, simple project, so finding the right pros is important. If your kitchen is part of a new landscape plan or the cornerstone of a landscape upgrade, you should be working with a landscape architect or landscape designer.
Businesses that sell outdoor appliances and materials often have a staff designer who can help you decide on the layout and features you need and can provide advice on how to make it happen.
A licensed general contractor who is experienced in outdoor kitchen construction can make sure the installation is done correctly. You will need to hire a licensed plumber and a licensed electrician for any plumbing or electrical work.
Design Considerations Before Adding an Outdoor Kitchen
Before getting to the actual design, think about exactly where the outdoor kitchen will go in your yard, the ideal size and layout of the space and the overall look and feel you want.
Your climate. One of the first things to consider is your climate. If summers are hot, muggy, rainy or short-lived, the amount of real time you’ll spend using the kitchen may be limited. A cold-winter climate will also mean additional maintenance to winterize the space.
Your lifestyle. A second consideration is what type of outdoor kitchen makes sense for your lifestyle. “We encourage homeowners to think about what they are going to use the kitchen for,” says Rob Douglass of TCP Custom Outdoor Living. “Is it just for them and their family? Is their family large or small? Do they entertain a lot or have big parties with lots of people?”
You may want an outdoor kitchen that comes with all the bells and whistles. Perhaps a simpler design that will make your current space more efficient is right for you. Whichever you choose, the space should be functional and hardworking. Most of all, it should be a space you’ll be happy to be in and to show off.
Where it will go. An outdoor kitchen should be easy to get to and easy to use. Designer John Algozzini of Hursthouse Landscape Architects and Contractors usually locates an outdoor kitchen near the most routinely used exit from the house, such as the family room or kitchen. “Proximity and usability make for good design,” he says.
Douglass is also a fan of putting the outdoor kitchen near the home. “Being near the back door, for ease of bringing food out or for cleanup, is always ideal,” he says. Adds Daren Langhorne of Core Outdoor Living in Clifton, Virginia, “In our experience, most clients want to hide their outdoor kitchens from interior sight lines. We think just the opposite. Put it in full view to entice yourself and your visitors to go out and play.”
There are times when moving an outdoor kitchen further away from the house might make more sense. If you have a satellite outdoor dining or lounging area, locating the kitchen nearby makes it easy to serve food and drinks and adds to the outdoor living ambiance.
Locating a kitchen space near a pool or another destination in your yard may also entice people to explore and appreciate the rest of the landscape. If your home opens directly onto a heavily used spot where a lot of people interact, especially a play area for children, locating the kitchen slightly away from the action will give you a safer spot for food preparation.
Your yard’s microclimate will also be a factor. Choosing a spot that won’t get a lot of wind will make the outdoor kitchen more comfortable. Unless you want to add a roof or shade structure overhead, a location that receives direct sun might be too hot. An extremely shady spot might also be uncomfortable for several months of the year.
Size and layout. Even the smallest outdoor kitchen designed for a single cook will need enough space for food prep, cooking, serving and getting started on cleanup. If more than one person will be using the space, you’ll want enough room for everyone to move comfortably.
The layouts that work well in indoor kitchens will be equally functional outside. Looking at the pros and cons of each can help you decide what will work best for your space and your needs.
How to Choose the Right Size and Layout for Your Outdoor Kitchen
Style. An outdoor kitchen is a great way to showcase your landscape’s design style. You might opt for a traditional look with classic brick; a Mediterranean style featuring stucco finishes, a granite countertop and a pizza oven; or a tropics-inspired outdoor paradise complete with a tiki bar. “The key item is that all the spaces should be synchronized, just like the interior of your home,” Algozzini says.
Outdoor Kitchen Appliances and Fixtures
Deciding what you want in your outdoor kitchen can be overwhelming. You’ll need a grill, of course, but would two be better? What’s the best refrigeration to choose? Should you add a sink?
To narrow down the list, focus first on what makes sense for you and your family. You can always plan so that it’s possible to add more to the design in the future
Grills and other cooking elements. A built-in grill is the centerpiece of an outdoor kitchen. Choosing the right grill for what you want to cook, how you want to cook and who you want to cook for is your starting point.
Refrigeration. An undercounter or full-size refrigerator makes it easy to stock cold drinks and keep food from spoiling. Adding a freezer, either separately or as part of the unit, gives you a spot for ice cubes, ice cream and other frozen treats.
You might consider adding two refrigerator units, with one specifically designed to hold beverages. If you place the latter near the end of the counter, your family and guests can easily access the beverage of their choice without getting in the way of the food preparation. A beer tap will add a party feel to the space. A long trough or bin that you can fill with ice and drinks can serve the same purpose as a drink refrigerator.
Any unit you choose will need to be rated for outdoor use to handle the high and low temperatures found outdoors. To extend its life, install the unit where it is sheltered. You may also need to take steps to protect it from freezing temperatures and long cold spells.
Sinks and faucets. A sink gives you a spot to rinse off food before cooking, wash veggies straight from the garden or even soak a pan or two. A stainless steel sink is both weather-hardy and easy to care for, although it can get hot and reflective in direct sun. Other material choices for an outdoor sink include stone, concrete and hammered metals such as copper or nickel.
Whatever material you choose, be sure it’s rated for outdoor use. Fortunately, most sinks are easy to take care of. You can also add a cover to keep dirt and debris out when it is not in use.
Sink installation isn’t as simple as it might seem, especially if you want both hot and cold water. “You’ll need to run both supply lines and add a drain line,” Algozzini says. Douglass adds that you might even need to add a small hot water heater.
You’ll find faucets that are stationary, that swivel or that allow you to pull down the faucet head. Whichever you choose, make sure it is rated for outdoor use.
Extra storage. Extra drawers, bins or cabinets can hold everything from grilling tools, dishes and serving pieces to glasses, cups and silverware.
A spot for trash and recycling makes cleanup much easier. A paper towel holder can be included on the countertop or set into a door. If you’re a dedicated griller, tuck a small pantry area or a spice rack into your design.
Tying It All Together
Once you’ve picked out the appliances and decided on the other elements that will form the core of your outdoor kitchen, you’ll need to pull everything together. That’s where countertops and bases or cabinets come into play. The counters and base material will also define the look and feel of the space.
Countertops. There are a number of material options for topping your outdoor kitchen. Stone is the most popular choice for outdoor countertops. It’s durable, beautiful and can handle spills, stains and the outdoor elements. A wood countertop fits in with almost any style, from traditional to contemporary, and its organic vibe complements most landscape designs. Concrete has become a favorite material for outdoor countertops, especially when paired with a contemporary landscape design. Tile is another countertop choice.
Bases and base cabinets. These are the backbone of your kitchen, defining the overall space, housing the grill or grills, holding the cabinets, drawers, refrigerators and sinks. Bases and base cabinets have to be hardworking. You’ll be preparing and serving food on them and possibly using them as a dining space, so you’ll need materials that can stand up to hard use, spills and the elements.
A professional will fabricate the basic structure, including adding necessary insulation and flameproofing materials. The next step will be adding the features you want and paneling them. Finishes can range from brick and wood to stucco, concrete, metals and natural materials such as bamboo.
Lighting. An outdoor kitchen, especially if combined with dining or seating areas, invites you to linger outside into the evening. Having the right lighting will make all the difference.
You want the grill and food prep areas to be well-lit. Walkways and transition areas may not need as much direct lighting, but there should be enough to make moving around safe and easy. A softer, more subtle ambient light in dining and gathering areas can help set the mood while allowing you to enjoy the changing natural light from twilight on.
While you can make do with string lights or a wall-mounted sconce or two and a task light next to the grill, putting together a lighting plan when designing the kitchen will increase the usability of your space.
Bonus: A sound system can add musical ambience to your outdoor gatherings and can be included in the electrical plan. You might even want to consider an outdoor-safe television for watching the game or having a movie night.
Heating and cooling. The temperature is not always ideal outdoors. That’s where fans and outdoor heaters come in. Fans, especially ceiling fans if your patio is under a roof, will circulate air and help keep spaces comfortable when the weather is hot. That same air circulation can also come into play when it’s cooler outside. Reversing the fan blades from a summer setting will draw the cold air up.
Strategically placed outdoor heaters, whether you choose a standalone or overhead version, can warm up a surprisingly large area. They can run on propane, natural gas or electricity, as long as the latter is rated for outdoor use. Most outdoor heaters will warm up an area 20 feet in diameter in an uncovered space. Those that run on propane tanks can be set where it is safe, and some electric heaters can be plugged into an outdoor outlet.
You will need a professional to install most electric outdoor heaters, especially if you want to tie them into your natural gas line.
Roofs and overhead structures. Having something overhead will protect both the kitchen area and guests from the elements, whether it’s harsh sunlight, rain, weather extremes or snow. This, in turn, will mean you can use your outdoor kitchen far more often. As a design feature, it sets the kitchen off as a separate space from both the house and the rest of the landscape. It allows you to easily add amenities like overhead lighting, heating and cooling.
A roof or overhead structure also has some drawbacks. An overhead structure is not recommended above many grills, for safety reasons. If you do have one, be sure you have the appropriate ventilation around the grill and an overhead vent installed. A patio roof can also close off the space unnecessarily.
A fully covered space is both more expensive and permanent, but it will ensure that both your kitchen and those using it are out of the elements. It will easily allow you to add in overhead lighting, heating and fans.
A partial roof can give you some shelter while still allowing you to keep the grill and other cooking areas safely ventilated and away from flammable materials.
A pergola adds the simplest overhead structure. This allows you to define the area without fully enclosing it. It also allows you to add other amenities such as lights, heaters and fans. You can build on this with an open roof system of permanent or adjustable slats or louvers. This will add some sun protection as well as create a dappled light that helps temper the glare of the sun.
Other Considerations for Adding an Outdoor Kitchen
Permitting and codes. Building an outdoor kitchen will almost always require permits, including for electrical and plumbing work. Codes can vary widely, so you’ll need to understand what your locale requires. A professional can help with this as well as with obtaining the actual permits.
Be sure to also check for any requirements or restrictions if you are part of a homeowners association.
When to do this project. Adding a hardscaping feature to your landscape is usually best done during good weather from spring to fall. Fortunately, you can get started with the beginning steps before you’re ready to start building. Use the latter months of fall, your winter downtime and early spring to get the plans in place.
How long it will take. Putting in an outdoor kitchen will not be a quick process. You will need to have plans and get permits, order the materials and appliances and plan for having features such as countertops fabricated. You may also need to have a concrete pad or other base installed before construction can begin. That can take several weeks to get into place.
Once things are ready to go, the actual installation of a very basic outdoor kitchen may only take a week or slightly more to install. If your project is more complex, plan on a longer build time. “You may have up to four trades working at one time,” Algozzini says. Scheduling different pros can also take some time.
Source: https://www.houzz.com/magazine/what-to-know-about-adding-an-outdoor-kitchen-stsetivw-vs~144980221